The Tech Nerd
January 2, 2024 - The Tech NerdHow to Install Garlic OS 2.0 (Public Alpha) on Anbernic RG35XX Plus
I recently acquired an Anbernic RG35XX Plus after being a Miyoo Mini Plus user. Being so accustomed to Onion OS on the Miyoo Mini, I wanted to get a similar experience with the RG35XX Plus so I decided to look into Garlic OS which I had heard is basically the Onion OS for the RG35XX (non-plus model).
Little did I know, Garlic OS 2.0, specifically updated to accommodate additional devices besides the RG35XX Plus, is extremely new. It's in an alpha stage as of this writing. This means that it is most definitely not in the finished state you would want to use daily as most things will be buggy and it is missing crucial features that make Garlic OS amazing on the original RG35XX.
Nonetheless, I still wanted to tinker with my new RG35XX Plus so I went ahead and installed it. I was made aware that there are no guides for Garlic OS 2.0, so I decided to do a quick write up on the steps I took to install it on my device.
Prerequisites:
- RG35XX Plus and the stock microSD card it came with
- A computer to download, extract, and transfer files
- An additional microSD card (I used a spare 16GB card I had laying around) formatted to exFAT
We're essentially going to be creating a bootable microSD card which will contain Garlic OS. This is accomplished by installing the bootloader on the device via the original microSD card
Installing the bootloader
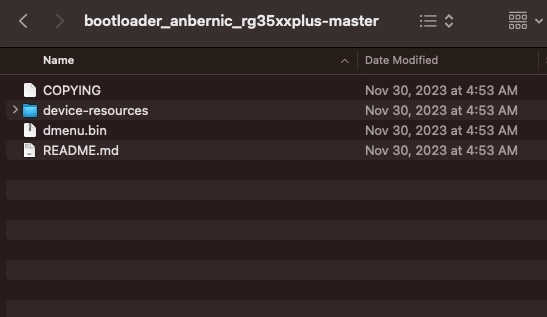
Download the RG35XX Plus bootloader and extract the contents. From the contents of this ZIP file, we only need the device-resources folder and the dmenu.bin file.

Copy and paste these two items (devices-resources folder and the dmenu.bin file) directly onto the root of your Stock OS microSD card that came with your RG35XX Plus.
The bootloader is now ready and we are ready to move to creating the Garlic OS bootable microsSD card
Creating the Garlic OS bootable microSD card
Before you do this step, make sure the microSD card you plan to use is formatted to exFAT.
To do this on Windows, simply right click on the memory card and select Format and then choose exFAT. On Mac OS, you can do this by using Disk Utility. Simply erase the whole microSD card and set the filesystem to be exFAT
Now that your Garlic OS microSD card is ready, create a new folder in it called boot.
Download this init file (right-click > save link as) and place it inside the boot folder you just created. If you don't want to save this link, go ahead and copy all the contents in the code below, create a new text file in the boot folder and name it init with no file extensions, paste the contents you copied, save and close.
#!/system/bin/sh

# Mount the rootfs loopback file
mount -t f2fs -o loop /boot/boot/rootfs.f2fs /root

# Bind mount the exfat partition
mount -o bind /boot /root/media

# Iterate the required folders
for f in dev dev/pts proc sys tmp firmware vendor/firmware lib/firmware lib/modules device-resources $DEVICE_CUSTOM_ROOTFS_MOUNTS
do
	# Create a mount point
	mkdir -p /root/$f

	# And bind mount the folder to it
	mount -o bind /$f /root/$f
done

# Setup the shell environment
export PATH=/usr/local/sbin:/usr/local/bin:/usr/sbin:/usr/bin:/sbin:/bin:$PATH
export HOME=/root
export SHELL=/bin/sh

# Set the CPU governors to performance
# This is needed for devices with buggy governors (most T310/T618/H700 devices)
# It's currently enabled for all devices to make debugging easier
for policy_dir in /sys/devices/system/cpu/cpufreq/policy*
do
	if [ -d "$policy_dir" ]
	then
		echo performance > "$policy_dir/scaling_governor"
	fi
done

# And hand off control to the rootfs
chroot /root /usr/bin/initNext, download armhf-rootfs.7z, extract the contents, and place the rootfs.f2fs file inside the boot folder.
Launching Garlic OS
Start with a powered off RG35XX Plus.
With the microSD cards ready, insert the stock microSD card with the bootloader into the TF1 slot.
Insert the Garlic OS microSD card into the TF2 slot.
Turn on your device and you should now be in Garlic OS.
Take a look around and then after you are disappointed with its current state and performance, simply remove the Garlic OS microSD card from the TF2 slot and continue using the stock os your device came with until Garlic OS gets updated.
Enjoying the content? Support me
© , The Tech Nerd | Privacy Policy